Tuning velocity controller
Velocity controller tuning means finding the correct drive settings and feedback gain values to achieve a proper Servo stiffness and response to a velocity setpoint change.
This tuning guide is for you if the final application uses the motor in velocity control mode such as spindle or as position mode with external closed loop position controller such as LinuxCNC.
Velocity control tuning method[edit | edit source]
| If motor has been tuned without the real load (i.e. motor shaft not attached), tuning parameters should be re-adjusted with the real load as the dynamic properties of the load has a significant effect on them. Large change of load properties may even cause servo instability. |
Preparations[edit | edit source]
Steps to do to begin position tuning:
- Ensure that motor is parameterized correctly and working and torque control tuning has been properly done.
- Attach motor to the target load and ensure it can rotate in both directions infinitely
- Make following parameter changes to Granity and click apply afterwards:
- Set drive in velocity control mode Control modeCM
- Choose Serial only setpoint input Control modeCM
- Make other necessary adjustments to have drive powered and enabled
- Untick Setpoint smoothingCIS
- Set Goals tab Setpoint dividerDIV and Setpoint multiplierMUL to 50
- Set Acceleration limitCAL & Velocity limitCVL reasonably to the levels that motor is expected to handle
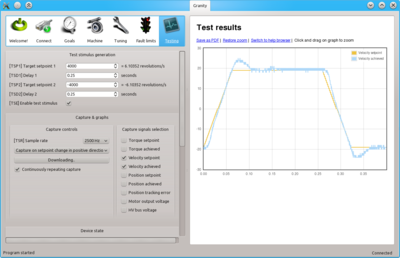
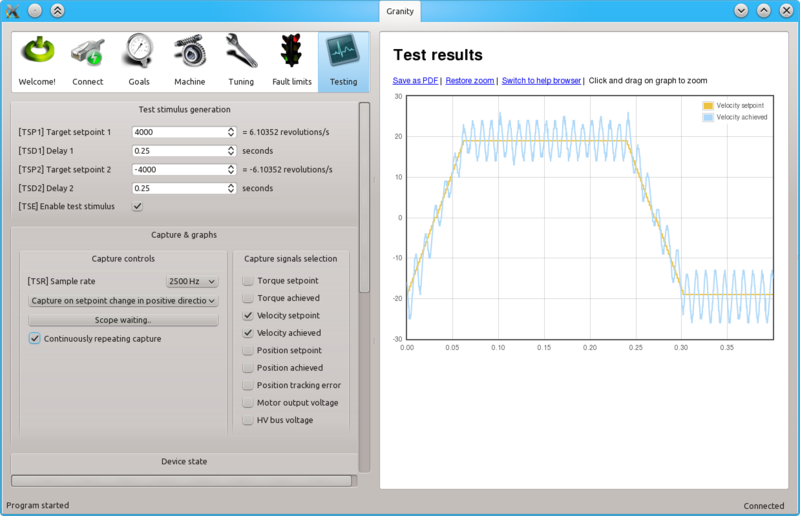
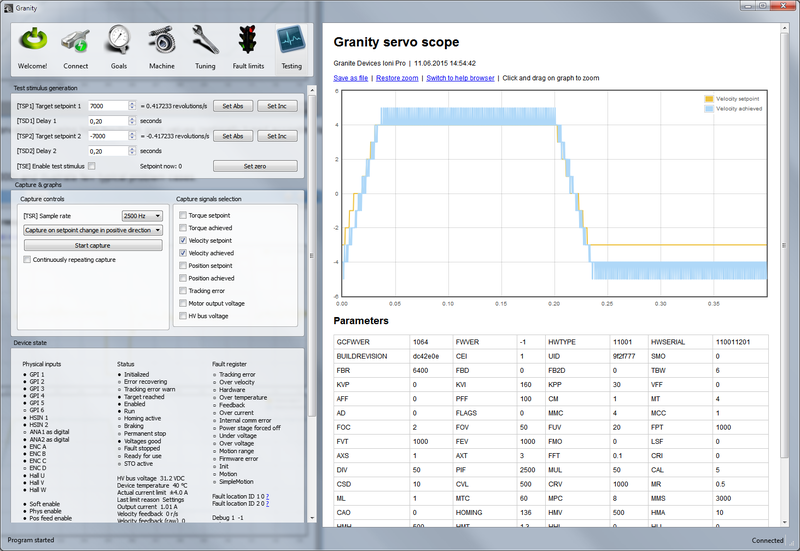
- Set-up the test stimulus and capture settings from Testing tab (an example, may be varied):
- Set target setpoint 1 TSP1 between 1000 and 16383 (16383 equals the max speed that is configured via Velocity limitCVL)
- Set delay 1 TSD1 to 0.25 seconds
- Set target setpoint 2 TSP2 to same, but negative, value of TSP1
- Set delay1 STD2 to 0.25 s
- Choose Sample rateTSR of 500 to 2500 Hz
- Choose Capture setpoint change in positive direction from the dropdown
- Tick Continuously repeating capture
- Tick Velocity setpoint and Velocity achieved from signals
- Tick Start capture to begin continous capture.
- Tick Enable test stimulusTSE to begin a continuous position back and forth spinning motion generation
Once the steps above are done, motor should be generating direction reversing spinning and velocity response graphs should appear on the right side of Granity about once in 3-5 seconds.
Finding velocity control gain values[edit | edit source]
| If the drive faults during this testing due to overcurrent, see Tuning torque controller for solutions. If drive faults due to following error or motion fault, increase the goal deviation fault limits at Fault limits tab. |
Tuning protocol[edit | edit source]
Tuning is begun with low or medium target speeds (TSP1 & 2 values below 5000).
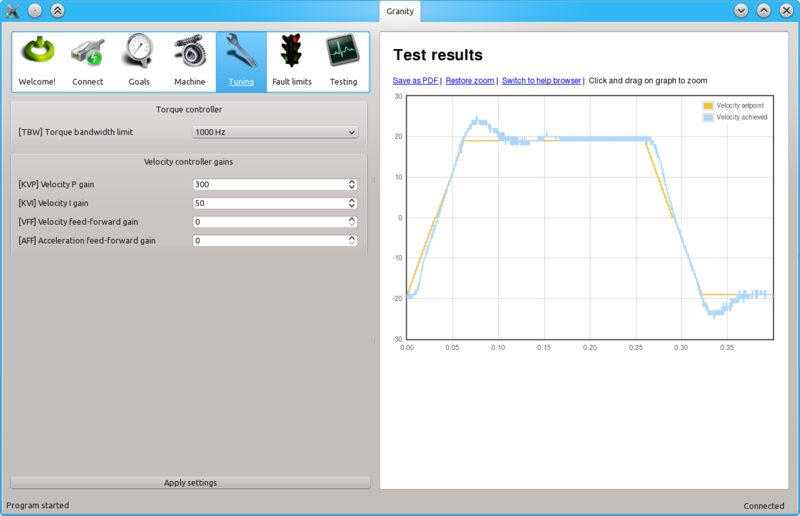
Initial velocity response with the default settings. As seen from the achieved velocity graph, it follows the setpoint velocity lazily and exhibits overshooting. In such state motor servo stiffness is low can be easily decelerated by adding load to the shaft.
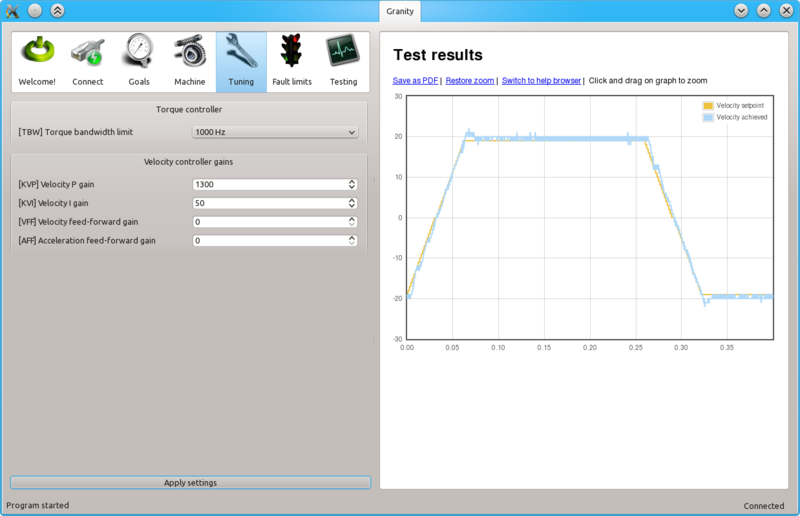
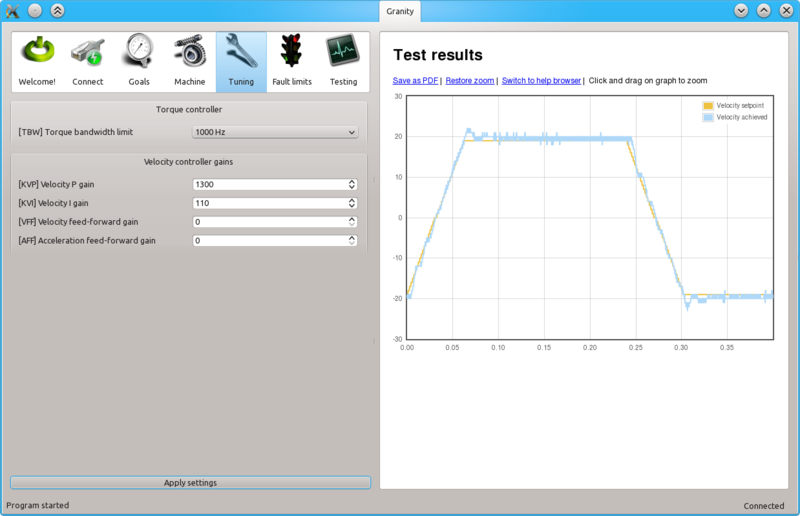
Begin tuning by increasing Velocity P gainKVP. This makes motor follow velocity setpoint much better.
To try different gains, go to Tuning tab, change value and click the Apply settings button.
When Velocity P gainKVP has been increased too much, the system becomes unstable and may start oscillating. In such case, you may hit Esc button to disable drive, reduce the gain and enable drive again.
Tip: torque bandwidth has significant effect on the behavior of KVP value and the point where it goes unstable. One may experiment different Torque bandwidth limitTBW settings to find the optimum.
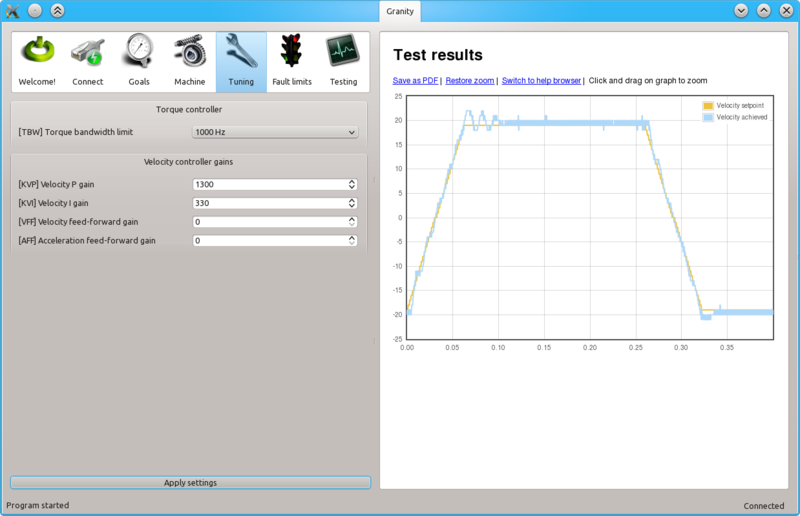
Once a maximum perfectly stable Velocity P gainKVP value has been found, start increasing Velocity I gainKVI gain by a similar fashion. The higher KVI value is, the better servo stiffness.
If Velocity P gainKVP is increased too much, the result is overshooting and even sustained oscillation. The cure is similar to the too high Velocity P gainKVP as described earlier.
Once stable and stiff gains has been found, increase setpoint values (TSP1 & 2) to test the settings with higher speeds. If necessary adjust the gains experimentally to find the optimum tuning that works satisfactory on all needed speeds.
Advanced tuning: Feed-forwards[edit | edit source]
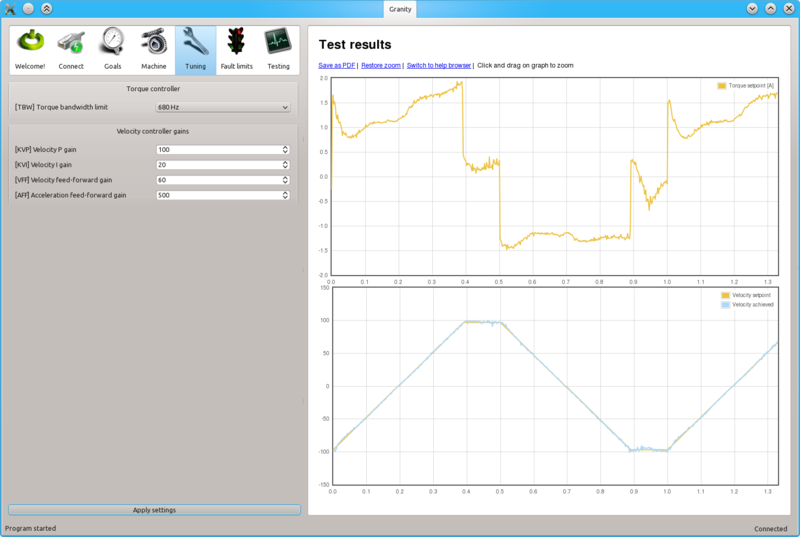
Feed-forward parameters may be used to boost motor responsiveness to setpoint change. Velocity feed-forward gainVFF and Acceleration feed-forward gainAFF essentially compensate system friction and mass limiting the dynamic performance.
The recommended way to tune FF gains, is to start increasing Velocity feed-forward gainVFF until the optimum level has been found. After that, increase Acceleration feed-forward gainAFF until the optimum point has been reached.
In the image above a sharp response has been achieved even with low feedback gains as feed-forward gains help motor to accelerate as demanded.
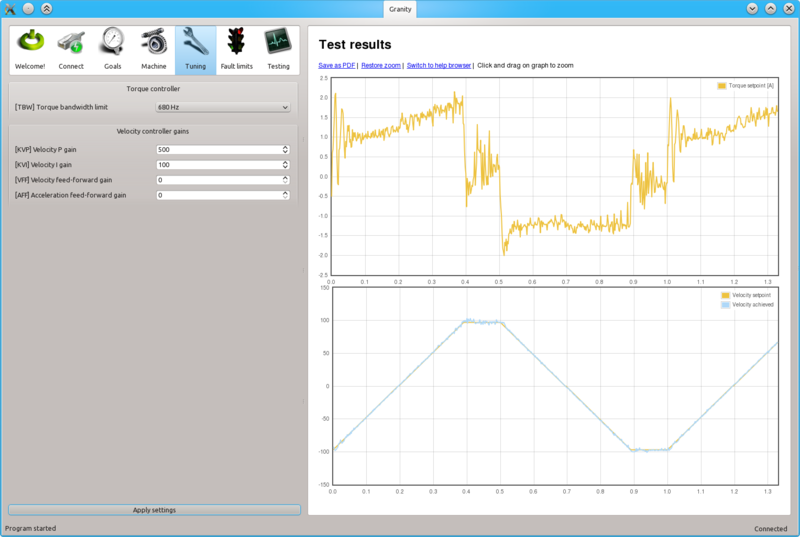
The image above shows similar response without feed-forwards but using high feedback gain values (optimally tuned according to the previous chapter).
Problem cases[edit | edit source]
Current/torque saturation[edit | edit source]
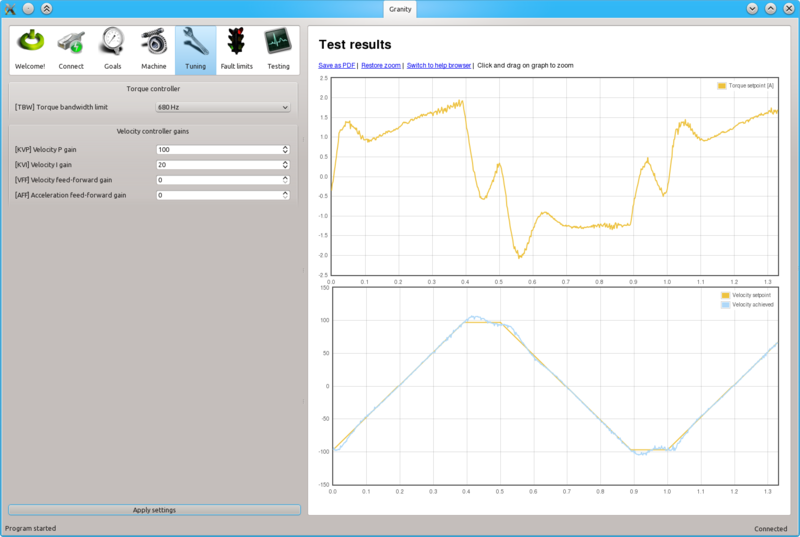
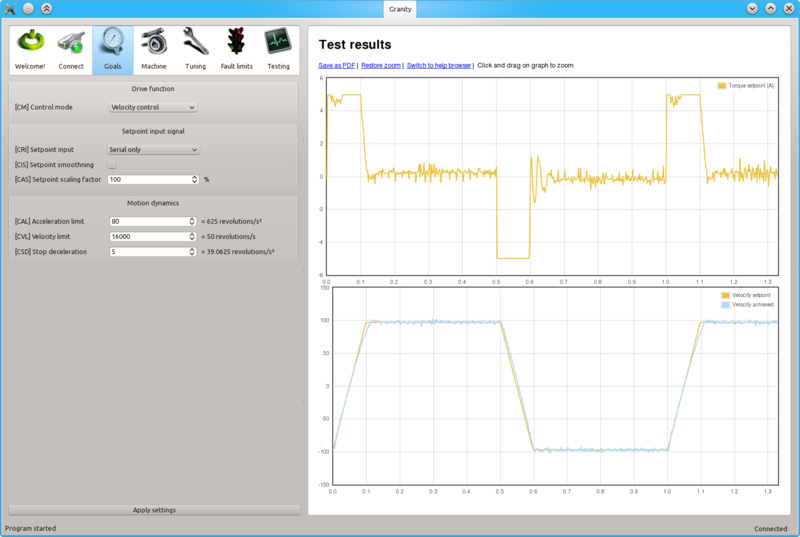
In the following test we run motor with higher speeds (TSPn > 10000) to illustrate a typical problem case.
The image above shows acceleration limited by insufficient torque produced by the motor. In this example the acceleration limit is set too high to be accelerated with the given motor torque limits (or current limits).
To verify if the problem happens due to torque limit, tick also Torque achieved and Torque setpoint signals from the Testing tab settings. In such way also motor currents will be displayed simultaneously with the position response curves. If the torque curve is limited to the set Peak current limitMMC, then the problem is insufficient torque. In the image above we can see that the torque curves are saturated/clipping at 5A and -5A levels which matches the configured Peak current limitMMC value of 5A in this demonstration.
To help this, try:
- Increasing current limits Peak current limitMMC and Continuous current limitMCC if possible
- Reducing Acceleration limitCAL and/or Velocity limitCVL limits
Oscillation[edit | edit source]
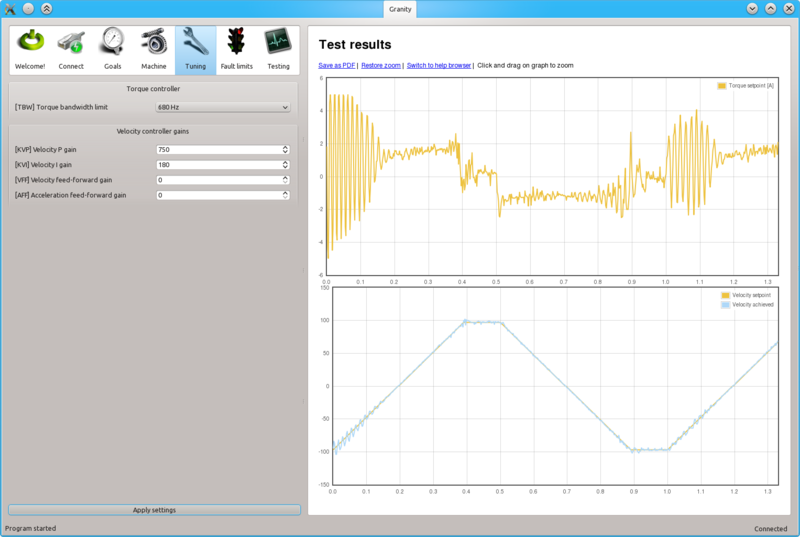
The above example shows instability and oscillation with high speeds even when the system was stable at lower speeds with the same parameters. In such case tune the system again at the most unfavorable conditions and speeds to achieve stability over all required operating conditions.
Low resolution velocity feedback[edit | edit source]
The above example shows another kind of problem: low resolution of velocity graph. This happens if feedback device resolution is low, and/or test velocity setpoint is low. However tuning is still possible. Tune KVP up until you find instability (you can hear it), and then take it down for 30-50% from that. Then adjust KVI up until graph looks best (no overshooting or oscillations). You may do this procedure with several torque bandwidths (TBW param) to see which gives best result.
Steps to do after tuning finished[edit | edit source]
- Stop test stimulus by unticking Enable test stimulusTSE
- Stop scope capture by unticking Continuously repeating capture
- Undo all temporary changes made to settings
- Save settings to drive memory by clicking Save settings on drive non-volatile memory button
- Set preferred setpoint source Setpoint inputCRI, also consider the use of Setpoint smoothingCIS
- If setpoint signal scaling is needed, adjust Setpoint multiplierMUL and Setpoint dividerDIV values
| Important: if drive will be controlled by an external motion controller with acceleration & velocity limits, such as CNC controller programs like Mach3 or LinuxCNC, then its highly recommended to increase acceleration limit Acceleration limitCAL to the maximum value of 32767 to prevent drive's internal acceleration limiter modifying the trajectory. Instead, set acceleration limit from the controller (i.e. settings of CNC software). |
Using drive in velocity control mode[edit | edit source]
If velocity control mode is the final desired operating mode, set-up the setpoint signal source from Granity Goals tab. Also see Signal path of motor drive for explanation of velocity setpoint scale.
In no event the Product Information or parts hereof shall be regarded as guarantee of conditions or characteristics. The Product Information or any part thereof may also not be regarded as a warranty of any kind. No liability of any kind shall be assumed by Author with respect to Product Information or any use made by you thereof, nor shall Author indemnify you against or be liable for any third party claims with respect to such information or any use thereof.
As content of this Wiki may be edited by user community, Granite Devices Oy or it's affiliates do not take any responsibility of the contents of this Wiki. Use information at your own risk. However, Granite Devices staff attempts to review all changes made to this Wiki and keep information trustworthy.
Without written consent, Granite Devices' Products or Intellectual Property shall not be used in situations or installations where living beings, material property, or immaterial property could be harmed by the operation, features or failures of Product. Products may only be used in a way where hazards like moving parts, electric shock, laser radiation, or fire can't be realized even if the content of this Wiki would suggest otherwise.
