Difference between revisions of "Argon user guide"
| [checked revision] | [checked revision] |
| Line 31: | Line 31: | ||
==Setup process overview== | ==Setup process overview== | ||
===Things needed=== | ===Things needed=== | ||
| − | [[File:Step1 collectthings.png| | + | [[File:Step1 collectthings.png|800px]] |
Ensure that you have all necessary things to start operating the device. Stop button, braking resistor and AC line filter are not strictly required but highly recommended. Motion [[Controller|controller]] may not be a physical item as it can be also a software on a computer. | Ensure that you have all necessary things to start operating the device. Stop button, braking resistor and AC line filter are not strictly required but highly recommended. Motion [[Controller|controller]] may not be a physical item as it can be also a software on a computer. | ||
===The first test=== | ===The first test=== | ||
| − | [[File:Step2 granityconnection.png| | + | [[File:Step2 granityconnection.png|800px]] |
Connect drive to PC with [[SimpleMotion V2 USB adapter]] and [[Granity]] to test connection, upgrade firmware if necessary and to learn Granity. If you're already familiar with all this, you may skip this step. | Connect drive to PC with [[SimpleMotion V2 USB adapter]] and [[Granity]] to test connection, upgrade firmware if necessary and to learn Granity. If you're already familiar with all this, you may skip this step. | ||
===Full wiring=== | ===Full wiring=== | ||
| − | [[File:Step3 wiring.png| | + | [[File:Step3 wiring.png|800px]] |
Carefully do the full wiring of the servo system. Consult an qualified electrician if necessary as dangerous voltages will be present. | Carefully do the full wiring of the servo system. Consult an qualified electrician if necessary as dangerous voltages will be present. | ||
| + | ===Paramerize motor only=== | ||
| + | [[File:Step4 tuningbaremotor.png|800px]] | ||
| + | |||
| + | ===Tune the machine=== | ||
| + | [[File:Step4 tuningmachine.png|800px]] | ||
| + | |||
===Setup process overview=== | ===Setup process overview=== | ||
The setup process is straightforward and kept as understandable as possible. In short the process goes as follows: | The setup process is straightforward and kept as understandable as possible. In short the process goes as follows: | ||
Revision as of 19:37, 10 August 2013
| Argon user guide is not yet finished and not safe to rely on. If you already have Argon drives, please wait until this notice has been removed before attempting to operate the device! |
In no event the Product Information or parts hereof shall be regarded as guarantee of conditions or characteristics. The Product Information or any part thereof may also not be regarded as a warranty of any kind. No liability of any kind shall be assumed by Author with respect to Product Information or any use made by you thereof, nor shall Author indemnify you against or be liable for any third party claims with respect to such information or any use thereof.
As content of this Wiki may be edited by user community, Granite Devices Oy or it's affiliates do not take any responsibility of the contents of this Wiki. Use information at your own risk. However, Granite Devices staff attempts to review all changes made to this Wiki and keep information trustworthy.
Without written consent, Granite Devices' Products or Intellectual Property shall not be used in situations or installations where living beings, material property, or immaterial property could be harmed by the operation, features or failures of Product. Products may only be used in a way where hazards like moving parts, electric shock, laser radiation, or fire can't be realized even if the content of this Wiki would suggest otherwise.
This is the official and latest setup guide of Argon (servo drive). Read it through before installing or operating Argon.
NOTE: This guide attempts to be as complete and precise as humanly possible, however it can never be perfect. Writers of this guide are not responsible if possible damages or losses caused by mistakes or lacks of this guide.
IMPORTANT: Argon drive should be installed and operated only by qualified electricians. Dangerous voltages and mechanics are involved and possibility of severe injury or even death is possible in case of installation or usage errors.
CURRENT STATUS: This guide is work in progress and should not be followed until this notice has been removed.
Contents
Reading the guide
Read trough the guide by following the outline and follow the hyper links to subtopics provided in the articles. Many useful and important key points are presented as:
| Electrical hazard warning (safety) |
| Warning/Caution (safety) |
| Machine danger (safety) |
| Risk of equipment damage |
| Info |
| Tip |
In addition to other documentation, make sure you have carefully read and understood all of the pages containing safety and equipment damage warnings before operating the device:
- Argon firmware releases
- Argon specifications
- Argon supply voltage troubleshooting
- Argon user guidebook
- Servo drive configuration files
Argon introduction
Argon is a servo motor drive designed by Granite Devices. If you are not familiar with the features and specifications of the drive, see following articles:
- Argon (servo drive) - overview & features
- Argon specifications - electrical, physical and operating condition specs
Setup process overview
Things needed
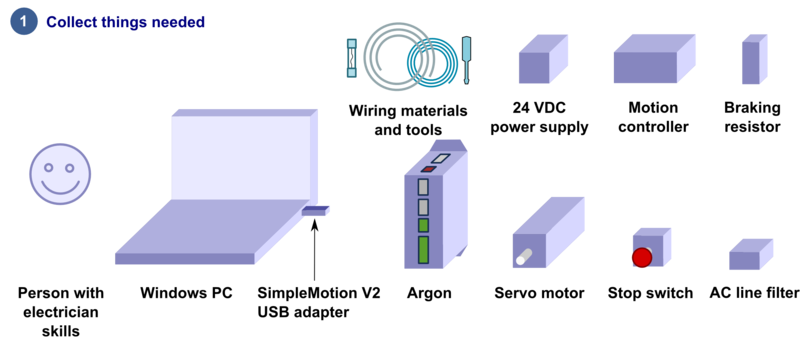
 Ensure that you have all necessary things to start operating the device. Stop button, braking resistor and AC line filter are not strictly required but highly recommended. Motion controller may not be a physical item as it can be also a software on a computer.
The first test
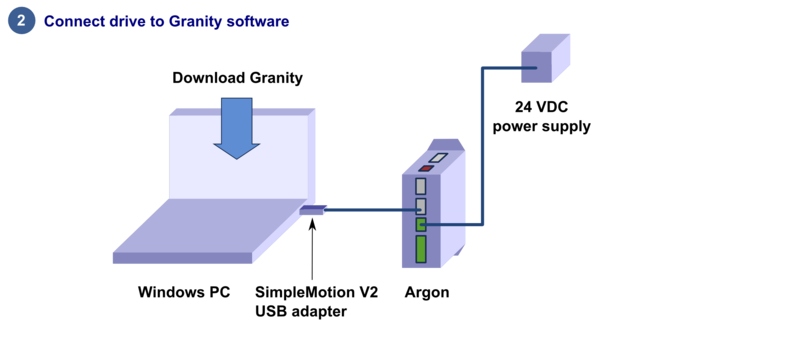
 Connect drive to PC with SimpleMotion V2 USB adapter and Granity to test connection, upgrade firmware if necessary and to learn Granity. If you're already familiar with all this, you may skip this step.
Full wiring
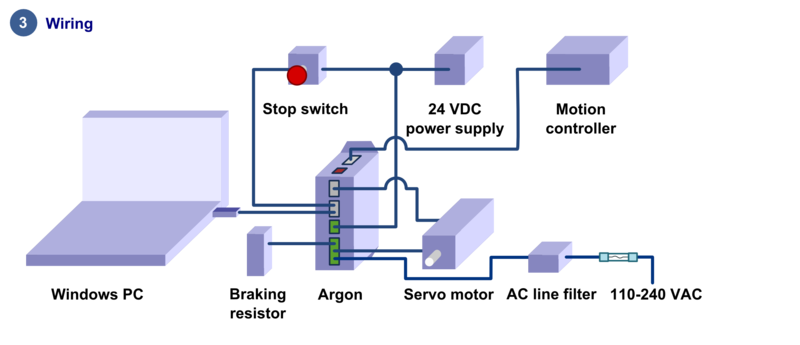
 Carefully do the full wiring of the servo system. Consult an qualified electrician if necessary as dangerous voltages will be present.
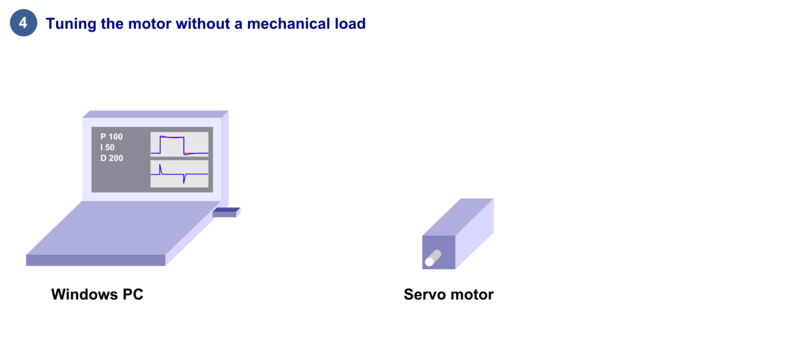
Paramerize motor only
Tune the machine
Setup process overview
The setup process is straightforward and kept as understandable as possible. In short the process goes as follows:
- Power up drive's logic voltage and test connection to Granity Argon setup software
- Make all necessary wiring to motor, AC mains and controller
- Once wired, connect again with Granity to make paramerization & servo tuning
- Finalize setup
In case of troubles, refer to troubleshooting chapter and articles in troubleshooting category
What you will need?
- Items needed during this guide
- Argon drive
- SimpleMotion V2 USB adapter
- 2 or more RJ45 Ethernet cables (Cat 5/5e/6, straight connection, not cross linked)
- Emergency stop button (normally closed NC type) or equivalent
- Regulated 24 VDC power supply, output capability at least 0.7A per drive
- A Argon compatible servo motor
- Recommended: Shielded AC power conductors. Non-shielded will work but increase EMI.
- Optional but highly recommended items
- Tools needed
- Screwdrivers
- Wire cutter
- Windows PC
- Skills needed
- Qualified electrician skills (license to make mains AC connections)
- Basic knowledge of servo systems
Step 1, testing connection to computer
Preparations
- Download and install the Granity software. Lates version is downloadable from the link: Granity software for windows (approx 10 MB)
- Connect PE of J4 connector to protective earth. After that wire 24 VDC power supply to Argon's J3 connector, however do not power up yet.
- Set Argon DIP switches to give an bus address to the device.
- Connect Argon J2.1 connector to SimpleMotion V2 USB adapter with a straight Ethernet cable and plug USB adapter to computer.
- Power up the 24 VDC power. Some leds should start blinking at the drive (specifily LD3 and/or LD4).
- Launch Granity software and:
- Go to Connect tab
- Ensure that SM V2 USB adapter is selected from drowdown list called Communication interface device
- Click Connect to drive
- Once list of connected drives pop up, select the one you connected and click Open
Now if everything has gone well, you should see information like drive model and serial number on the Connect tab. Connection has been successfully tested and drive may be disconnected to proceed with next setup step.


