Difference between revisions of "Argon user guide/Wiring"
| [checked revision] | [checked revision] |
(→Ports and connectors) |
|||
| (32 intermediate revisions by one other user not shown) | |||
| Line 1: | Line 1: | ||
| − | {{ArgonManualNav}} | + | {{ArgonManualNav}} |
| − | == | + | ==Mechanical installation and cooling== |
| − | [[File: | + | [[File:Argon installation.png|thumb|A proper Argon installation orientation and spacing with optional [[Argon user guide/Mating connectors and accessories|heat sinks]] and an optional cooling fan. For high power application, [[Replacing Argon fuse|replacing also the internal fuse]] may be necessary.]]Argon drives should be installed vertically (J5 connector up) with at least 50 mm free air space between the device surfaces and possible cabinet walls to allow heat transfer along the heat sink side of the device. |
| + | Cooling may be further by mounting additional [[Argon user guide/Mating connectors and accessories|heat sinks]] to the bottom of the device and/or using a fan blowing air from bottom to up. If fan is used, it should have dust filter to prevent dust inside the drives. | ||
| + | |||
| + | Such additional cooling measures are typically necessary only when '''average''' motor current is higher than 4 Amperes [[peak value of sine]]. Most of [[Control modes|position control]] servo systems run cool enough without additional cooling as the load is highly varying and the average output power is low. In any case, it is safe to experiment without cooling as drive's over temperature protection will shut down the drive in case of overheating. | ||
| + | |||
| + | ==Wiring overview== | ||
| + | [[File:Wiringoverview notitle.png|600px]] | ||
| + | [[File:Argon_test_setup_m.jpg|thumb|A working test setup wiring of Argon. Just connection to a computer and AC power is needed to operate the drive and motor with [[Granity]] or other [[SimpleMotion V2]] app. Note: emergency stopping, [[Argon_user_guide/Earthing|enhanced grounding]], fuse and all recommended [[EMI]] filters are not installed.]] | ||
| + | [[File:Argon_test_stup_closeup_m.jpg|thumb|A close-up of the test test wiring. Note: emergency stopping, [[Argon_user_guide/Earthing|enhanced grounding]], fuse and all recommended [[EMI]] filters are not installed.]] | ||
;The minimum wiring for a servo system (after configuration state): | ;The minimum wiring for a servo system (after configuration state): | ||
| − | # Safety [[Argon user guide/Earthing|earthing ]]to port J4 and | + | # Safety [[Argon user guide/Earthing|earthing ]]to port J4, heatsink and case |
# 24 VDC wiring to port J3 | # 24 VDC wiring to port J3 | ||
# [[Safe torque off]] and enable signals to port J2. See [[SimpleMotion V2 port|how]]. | # [[Safe torque off]] and enable signals to port J2. See [[SimpleMotion V2 port|how]]. | ||
| Line 23: | Line 31: | ||
==Ports and connectors== | ==Ports and connectors== | ||
[[File:Argonfront.png|800px|Argon front side connections]] | [[File:Argonfront.png|800px|Argon front side connections]] | ||
| + | |||
| + | [[File:ArgonSideIO.png|550px|Argon side connections & DIP switches]] | ||
| + | |||
===J1 feedback device port=== | ===J1 feedback device port=== | ||
J1 connector type is 15 pin female D-Sub and should be mated with 15 pin male D-Sub counterpart. | J1 connector type is 15 pin female D-Sub and should be mated with 15 pin male D-Sub counterpart. | ||
| Line 36: | Line 47: | ||
J3 is a 3 pole terminal block type connector used for supplying 24VDC to drive and optionally controlling motor solenoid brake. | J3 is a 3 pole terminal block type connector used for supplying 24VDC to drive and optionally controlling motor solenoid brake. | ||
| − | See the main article [[Argon user guide/ | + | See the main article [[Argon user guide/J3 connector wiring|J3 connector wiring]]. |
===J4 power & motor port=== | ===J4 power & motor port=== | ||
| Line 44: | Line 55: | ||
===J5 Inputs/Outputs=== | ===J5 Inputs/Outputs=== | ||
| − | J5 Is a 26 pin [http://en.wikipedia.org/wiki/Insulation-displacement_connector IDC connector] located on the side of Argon. The connector serves as general purpose I/O with [[setpoint signal]] inputs featuring: limit & home switch inputs, status indicator outputs, | + | J5 Is a 26 pin [http://en.wikipedia.org/wiki/Insulation-displacement_connector IDC connector] located on the side of Argon. The connector serves as general purpose I/O with [[setpoint signal]] inputs featuring: limit & home switch inputs, status indicator outputs, [[Analog setpoint|analog]], [[Pulse and direction|pulse and direction]], [[quadrature]] or [[PWM]] types of [[Setpoint signal|setpoint]] inputs and secondary [[feedback devices|feedback device]] input. |
See the main article [[Argon I/O connector electrical interfacing]] for pin-out and wiring guide. | See the main article [[Argon I/O connector electrical interfacing]] for pin-out and wiring guide. | ||
| Line 60: | Line 71: | ||
==Wiring recommendations== | ==Wiring recommendations== | ||
Read general wiring recommendations articles at: | Read general wiring recommendations articles at: | ||
| − | *http://www.electrical-installation.org/enwiki/Wiring_recommendations | + | *[http://www.electrical-installation.org/enwiki/Wiring_recommendations Wire routing recomendations] |
| − | *http://www.electrical-installation.org/enwiki/EMC_implementation_-_Implementation_of_shielded_cables | + | *[http://www.electrical-installation.org/enwiki/EMC_implementation_-_Implementation_of_shielded_cables Cable shield connection] |
==Basic wiring scheme== | ==Basic wiring scheme== | ||
| − | + | Before wiring, be sure to read through the main articles regarding J1-J5 ports. | |
| + | ===Connecting multiple drives=== | ||
| + | Note this drawing does not include wiring to motor (J4), motor brake (J3), feedback device (J1), controller (J5) and AC power input circuity. | ||
| + | {{caution|Using HV DC bus sharing via VP and VN terminals or supplying external DC voltage to them, renders the [[safe torque off]] '''STO1''' input unusable because STO1 is based on by cutting the AC supply. In order to preserve STO1 functionality with DC bus sharing, the STO1 signal must be fed simultaneously to all DC bus sharing drives. If an external DC supply is used (no AC input to L & N), then STO1 will not operate.<br/><br/>STO1 will also be inoperable if DC voltage is supplied to L & N inputs instead of AC. With DC supply, STO1 ibput must be always powered as the internal relay may damage if STO1 used with DC supply. }} | ||
| + | [[File:Argon_wiring_multiple.png|800px]] | ||
| + | ===Wiring of single drive=== | ||
[[File:Argonwiringoverview.png|800px]] | [[File:Argonwiringoverview.png|800px]] | ||
| − | + | [[Category:Argon_wiring]] | |
| − | + | ||
| − | + | ||
| − | + | ||
| − | + | ||
| − | + | ||
| − | + | ||
| − | [[Category: | + | |
Latest revision as of 10:32, 5 March 2020
Mechanical installation and cooling[edit | edit source]
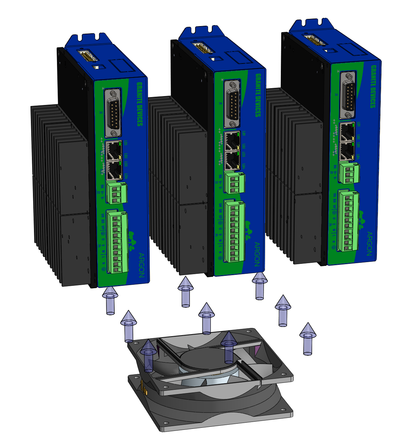
Cooling may be further by mounting additional heat sinks to the bottom of the device and/or using a fan blowing air from bottom to up. If fan is used, it should have dust filter to prevent dust inside the drives.
Such additional cooling measures are typically necessary only when average motor current is higher than 4 Amperes peak value of sine. Most of position control servo systems run cool enough without additional cooling as the load is highly varying and the average output power is low. In any case, it is safe to experiment without cooling as drive's over temperature protection will shut down the drive in case of overheating.
Wiring overview[edit | edit source]
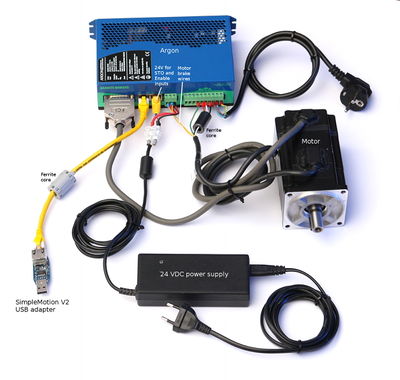
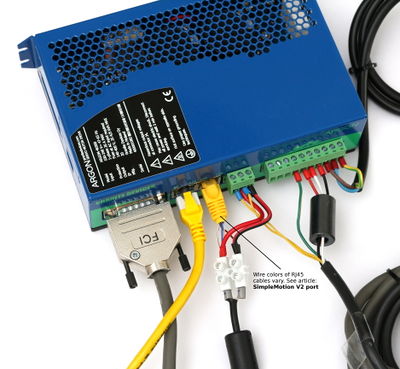
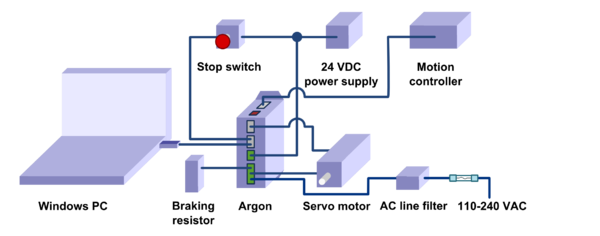
- The minimum wiring for a servo system (after configuration state)
- Safety earthing to port J4, heatsink and case
- 24 VDC wiring to port J3
- Safe torque off and enable signals to port J2. See how.
- Motion controller wiring:
- if pulse & direction, analog, PWM or quadrature setpoint signal used, wire signals to port J5
- if setpoint delivered over SimpleMotion V2 bus, then a cable from SimpleMotion V2 compatible communication interface device to J2
- Axis limit switches wired to port J5
- Feedback device wiring to port J1
- Motor connection to port J4
- AC input power to port J4. Use an external fuse with this input.
- Optional wiring
- AC Power line filter on the wire entering J4
- Wiring of optional braking resistor to port J4
- Motor solenoid brake wiring to port J3
- Additionally following are required for drive configuration with Granity
- A cable from SimpleMotion V2 USB adapter to port J2
Ports and connectors[edit | edit source]
J1 feedback device port[edit | edit source]
J1 connector type is 15 pin female D-Sub and should be mated with 15 pin male D-Sub counterpart.
For pin-out and connection examples, see the main article J1 connector wiring.
J2.1 and J2.2 Simplemotion & E-stop ports[edit | edit source]
J2.1 and J2.2 are RJ45 type connectors and mates with standard Cat 5 & 6 Ethernet cables. Both of these ports are connected pin-to-pin parallel to allow chaining of Argon devices.
See the main article SimpleMotion V2 port.
J3 24V power and motor brake port[edit | edit source]
J3 is a 3 pole terminal block type connector used for supplying 24VDC to drive and optionally controlling motor solenoid brake.
See the main article J3 connector wiring.
J4 power & motor port[edit | edit source]
J4 is a 10 pole terminal block connector for several functions: earthing, AC power input, motor output, regenerative resistor output and HV DC link sharing.
See the main article J4 connector wiring.
J5 Inputs/Outputs[edit | edit source]
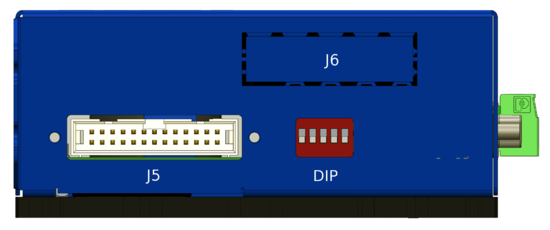
J5 Is a 26 pin IDC connector located on the side of Argon. The connector serves as general purpose I/O with setpoint signal inputs featuring: limit & home switch inputs, status indicator outputs, analog, pulse and direction, quadrature or PWM types of setpoint inputs and secondary feedback device input.
See the main article Argon I/O connector electrical interfacing for pin-out and wiring guide.
J6 Expansion slot[edit | edit source]
This slot is reserved for Argon add-on card that may be installed inside the drive.
DIP Switches[edit | edit source]
DIP switches serves as address selector when connecting the drive to SimpleMotion V2 bus or Granity.
See the main article Setting device bus address.
Mating parts[edit | edit source]
See list of Argon mating connectors and accessories
Wiring recommendations[edit | edit source]
Read general wiring recommendations articles at:
Basic wiring scheme[edit | edit source]
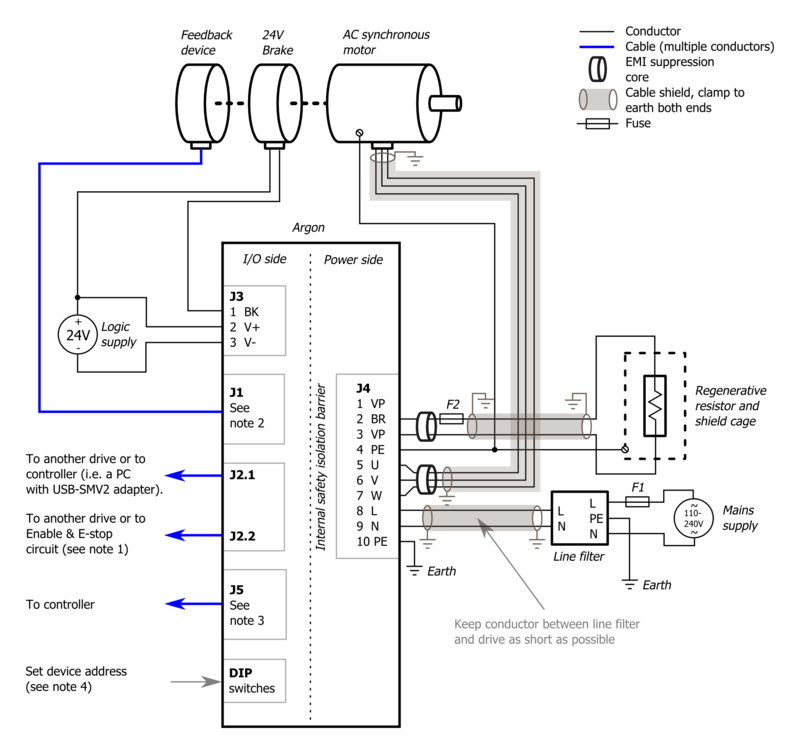
Before wiring, be sure to read through the main articles regarding J1-J5 ports.
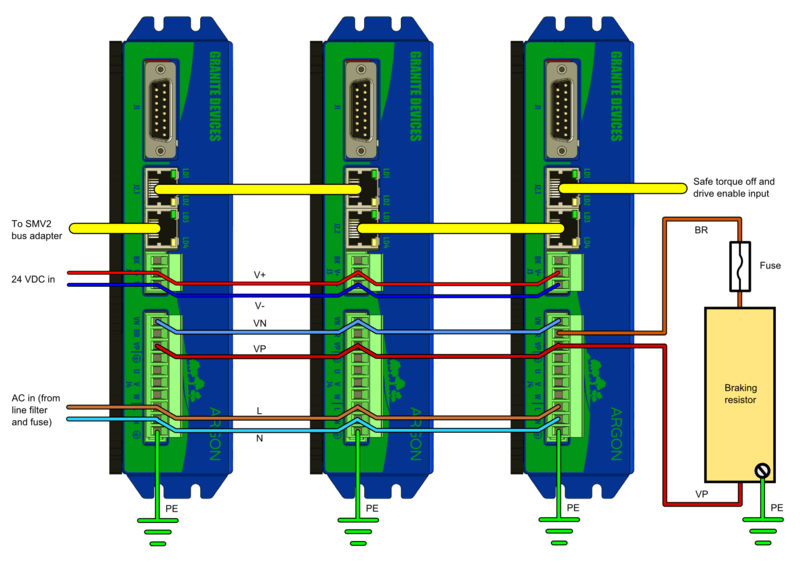
Connecting multiple drives[edit | edit source]
Note this drawing does not include wiring to motor (J4), motor brake (J3), feedback device (J1), controller (J5) and AC power input circuity.
| Using HV DC bus sharing via VP and VN terminals or supplying external DC voltage to them, renders the safe torque off STO1 input unusable because STO1 is based on by cutting the AC supply. In order to preserve STO1 functionality with DC bus sharing, the STO1 signal must be fed simultaneously to all DC bus sharing drives. If an external DC supply is used (no AC input to L & N), then STO1 will not operate. STO1 will also be inoperable if DC voltage is supplied to L & N inputs instead of AC. With DC supply, STO1 ibput must be always powered as the internal relay may damage if STO1 used with DC supply. |
