Difference between revisions of "Connecting motor to SimuCUBE"
| [checked revision] | [checked revision] |
m |
|||
| (13 intermediate revisions by one other user not shown) | |||
| Line 1: | Line 1: | ||
| − | {{ | + | {{SimucubeManualNav}}Connecting motor to SimuCUBE involves wiring motor power and [[Feedback devices|Feedback device]] (encoder) to the corresponding connectors. This page instructs making these connections properly. |
| + | ==Overview== | ||
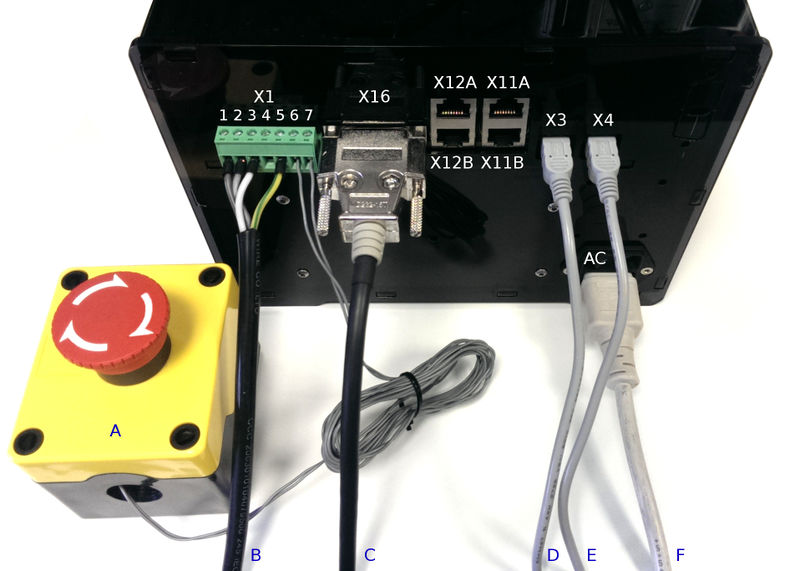
| + | [[File:simucubeboxcabling_annotated.jpg|thumb|center|800px|Cabling of SimuCUBE, see list of connectors and cables below.]] | ||
| + | Connectors and cables of image above: | ||
*X1 - 7 pin terminal for motor power and E-stop | *X1 - 7 pin terminal for motor power and E-stop | ||
*X16 - Motor feedback device/encoder input | *X16 - Motor feedback device/encoder input | ||
| Line 13: | Line 16: | ||
*D - USB to PC (HID/game controller) | *D - USB to PC (HID/game controller) | ||
*E - USB to PC (Granity/IONI configuration) | *E - USB to PC (Granity/IONI configuration) | ||
| − | *F - AC power cord. }} | + | *F - AC power cord. |
| + | |||
| + | == Motor power == | ||
| + | |||
| + | ===Legend=== | ||
| + | Colors codes in the pin-out tables: | ||
| + | {| class="wikitable" | ||
| + | |- | ||
| + | ! Color | ||
| + | |- | ||
| + | | class="powpin" |Supply pin | ||
| + | |- | ||
| + | | class="inpin" |Input pin | ||
| + | |- | ||
| + | | class="outpin" |Output pin | ||
| + | |} | ||
| + | |||
| + | Motor power cable consists windings and the protective earth conductors. In 3 phase AC servo motor there are four conductors and they should be connected to X1 terminal block according to the table below: | ||
| + | |||
| + | {| class="wikitable" | ||
| + | |- | ||
| + | ! Pin number !! Signal name !! Function | ||
| + | !Usage | ||
| + | |- | ||
| + | | 1 || class="outpin" | U / PH1|| Motor phase 1 | ||
| + | |AC servo motor phase U | ||
| + | |- | ||
| + | | 2 || class="outpin" | V / PH2|| Motor phase 2 | ||
| + | |AC servo motor phase V | ||
| + | |- | ||
| + | | 3 || class="outpin" | W / PH3|| Motor phase 3 | ||
| + | |AC servo motor phase W | ||
| + | |- | ||
| + | | 4 || class="outpin" | PH4|| Motor phase 4 | ||
| + | |Used only with 2-phase stepping motor | ||
| + | |- | ||
| + | | 5|| class="powpin" |GND || Motor protective earth conductor | ||
| + | |The yellow/green wire | ||
| + | |- | ||
| + | | 6|| class="inpin" |E-Stop / STO || E-Stop switch input | ||
| + | | rowspan="2" |Normall closed (conducting) E-Stop switch goes between pins 6 and 7 | ||
| + | |- | ||
| + | | 7|| class="powpin" |+5 V || 5 VDC output (max 100 mA) | ||
| + | |} | ||
| + | |||
| + | Refer your motor manufacturer's data sheet/specifications to identify wire colors of U, V and W phases. | ||
| + | |||
| + | == Motor feedback device == | ||
| + | Feedback device (in this case position sensor, usually encoder) need to be connected to SimuCUBE X16 input. X16 connector type on SimuCUBE is ''D-Sub 15 pin female with two pin rows'', so the mating part is ''D-Sub 15 pin male connector with two pin rows''. | ||
| + | |||
| + | |||
| + | |||
| + | === Case A: pre-made encoder cable === | ||
| + | If you have a motor that comes with pre-made encoder cable with SimuCUBE, [[IONI Servo & Stepper Drive|IONI]] or [[ARGON]] compatible connector, then simply plug this connector to SimuCUBE X16. | ||
| + | |||
| + | === Case B: make encoder connection === | ||
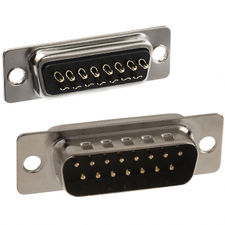
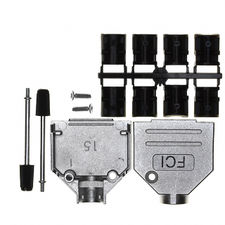
| + | [[File:dsub15male2row.jpg|thumb|225px|right|Mating X16 connector to SimuCUBE (D-Sub 15 pins, male, 2 rows, with solder cups)]][[File:dsub15hood.jpg|225px|thumb|D-Sub connector hood (15 pin size, 4-40 threaded screws)]]If motor encoder cable comes with bare wire ends, or with incompatible connector, then soldering a D-Sub connector with SimuCUBE pin-out is necessary. | ||
| + | {| class="wikitable" | ||
| + | |- | ||
| + | ! Pin # !! Pin name !! Electrical type (in most feedback device modes) | ||
| + | |- | ||
| + | | Shell|| class="powpin" |GND||Cable shield | ||
| + | |- | ||
| + | | 1|| class="inpin" |HALL_W||Hall sensor digital input W ''(optional)'' | ||
| + | |- | ||
| + | | 2|| class="inpin" |HALL_V||Hall sensor digital input V ''(optional)'' | ||
| + | |- | ||
| + | | 3|| class="inpin" |HALL_U||Hall sensor digital input U ''(optional)'' | ||
| + | |- | ||
| + | | 4|| class="powpin" |GND||Encoder supply ground / 0 V | ||
| + | |- | ||
| + | | 5|| class="inpin" |B-||Encoder differential input B- | ||
| + | |- | ||
| + | | 6|| class="inpin" |B+||Encoder differential input B+ | ||
| + | |- | ||
| + | | 7|| class="inpin" |A-||Encoder differential input A- | ||
| + | |- | ||
| + | | 8|| class="inpin" |A+||Encoder differential input A+ | ||
| + | |- | ||
| + | | 9|| class="powpin" |5V_OUT||Encoder supply +5 V output | ||
| + | |- | ||
| + | | 10|| class="powpin" |GND ||Encoder supply ground / 0 V | ||
| + | |- | ||
| + | | 11|| class="inpin" |GPI3|| ''no connection'' | ||
| + | |- | ||
| + | | 12|| class="inpin" |GPI2|| ''no connection'' | ||
| + | |- | ||
| + | | 13|| class="inpin" |GPI1|| ''no connection'' | ||
| + | |- | ||
| + | | 14|| class="inpin" |C-||Encoder differential input C- | ||
| + | |- | ||
| + | | 15|| class="inpin" | C+||Encoder differential input C+ | ||
| + | |} | ||
| + | |||
| + | In the table above, A, B, and C indicate the quadrature encoder differential signals. C channel is often also denoted as Z, Index or IDX. Refer your motor manufacturer's data sheet/specifications to identify wire colors for encoder signals. Pay extra attention to 5V and GND wiring as miswiring these may cause permanent damage to the encoder. | ||
| + | |||
| + | ==== Making encoder connector ==== | ||
| + | List of needed items & skills for making the encoder connector: | ||
| + | * D-Sub connector and connector hood, see [[List of D-Sub 15 pin connector parts]] | ||
| + | * Wire cutters & wire stripping tools | ||
| + | * Soldering iron | ||
| + | * Soldering skills | ||
| + | * Motor manufacturer's data sheet where wire colors and signals are specified | ||
| + | |||
| + | {{next|[[Installing MMos firmware into SimuCUBE]]}} | ||
| + | __NOTOC__ | ||
[[Category:SimuCUBE_user_guide]] | [[Category:SimuCUBE_user_guide]] | ||
Latest revision as of 12:58, 28 February 2018
Connecting motor to SimuCUBE involves wiring motor power and Feedback device (encoder) to the corresponding connectors. This page instructs making these connections properly.Overview[edit | edit source]
Connectors and cables of image above:
- X1 - 7 pin terminal for motor power and E-stop
- X16 - Motor feedback device/encoder input
- X3 - USB connector (HID/game controller)
- X4 - USB connector (Granity/IONI configuration)
- AC - 110-240 VAC power inlet
- X12A & X12B - External button inputs (optional)
- X13A - Pedal inputs (optional)
- X11B - External analog inputs (optional)
- A - E-Stop (normally closed/conducting switch)
- B - Motor power cable
- C - Motor encoder cable
- D - USB to PC (HID/game controller)
- E - USB to PC (Granity/IONI configuration)
- F - AC power cord.
Motor power[edit | edit source]
Legend[edit | edit source]
Colors codes in the pin-out tables:
| Color |
|---|
| Supply pin |
| Input pin |
| Output pin |
Motor power cable consists windings and the protective earth conductors. In 3 phase AC servo motor there are four conductors and they should be connected to X1 terminal block according to the table below:
| Pin number | Signal name | Function | Usage |
|---|---|---|---|
| 1 | U / PH1 | Motor phase 1 | AC servo motor phase U |
| 2 | V / PH2 | Motor phase 2 | AC servo motor phase V |
| 3 | W / PH3 | Motor phase 3 | AC servo motor phase W |
| 4 | PH4 | Motor phase 4 | Used only with 2-phase stepping motor |
| 5 | GND | Motor protective earth conductor | The yellow/green wire |
| 6 | E-Stop / STO | E-Stop switch input | Normall closed (conducting) E-Stop switch goes between pins 6 and 7 |
| 7 | +5 V | 5 VDC output (max 100 mA) |
Refer your motor manufacturer's data sheet/specifications to identify wire colors of U, V and W phases.
Motor feedback device[edit | edit source]
Feedback device (in this case position sensor, usually encoder) need to be connected to SimuCUBE X16 input. X16 connector type on SimuCUBE is D-Sub 15 pin female with two pin rows, so the mating part is D-Sub 15 pin male connector with two pin rows.
Case A: pre-made encoder cable[edit | edit source]
If you have a motor that comes with pre-made encoder cable with SimuCUBE, IONI or ARGON compatible connector, then simply plug this connector to SimuCUBE X16.
Case B: make encoder connection[edit | edit source]
If motor encoder cable comes with bare wire ends, or with incompatible connector, then soldering a D-Sub connector with SimuCUBE pin-out is necessary.| Pin # | Pin name | Electrical type (in most feedback device modes) |
|---|---|---|
| Shell | GND | Cable shield |
| 1 | HALL_W | Hall sensor digital input W (optional) |
| 2 | HALL_V | Hall sensor digital input V (optional) |
| 3 | HALL_U | Hall sensor digital input U (optional) |
| 4 | GND | Encoder supply ground / 0 V |
| 5 | B- | Encoder differential input B- |
| 6 | B+ | Encoder differential input B+ |
| 7 | A- | Encoder differential input A- |
| 8 | A+ | Encoder differential input A+ |
| 9 | 5V_OUT | Encoder supply +5 V output |
| 10 | GND | Encoder supply ground / 0 V |
| 11 | GPI3 | no connection |
| 12 | GPI2 | no connection |
| 13 | GPI1 | no connection |
| 14 | C- | Encoder differential input C- |
| 15 | C+ | Encoder differential input C+ |
In the table above, A, B, and C indicate the quadrature encoder differential signals. C channel is often also denoted as Z, Index or IDX. Refer your motor manufacturer's data sheet/specifications to identify wire colors for encoder signals. Pay extra attention to 5V and GND wiring as miswiring these may cause permanent damage to the encoder.
Making encoder connector[edit | edit source]
List of needed items & skills for making the encoder connector:
- D-Sub connector and connector hood, see List of D-Sub 15 pin connector parts
- Wire cutters & wire stripping tools
- Soldering iron
- Soldering skills
- Motor manufacturer's data sheet where wire colors and signals are specified
| Read next |


